
Fall is here, and it’s the perfect time to add some seasonal charm to your home with a cozy quilt project! In this tutorial, we’re going to dive into creating a beautiful Pumpkin Patch quilt block featuring a maple leaf design at the center. Not only will I guide you through making a single pumpkin block, but I’ll also show you how to assemble four blocks into different layout variations for wall hangings, table runners, or placemats! Let’s get started!
Materials Needed
For this tutorial, you’ll need:
- Main pumpkin fabric
- Lighter fabric for the maple leaf center
- Background fabric
- Green fabric for the stem
- Download the free pumpkin block pattern
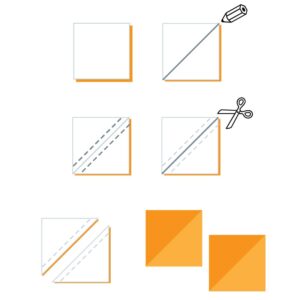
Step 1: Making the Half-Square Triangles
To start, you’ll need two 2.5″ squares each from your maple leaf fabric and pumpkin fabric. Sew these squares together to form half-square triangles—this will give you the pieces needed for the sides of the maple leaf.
At the same time, take one 2″ maple leaf square and sew it to a smaller pumpkin-colored square on opposite corners, which will form the stem of your maple leaf.
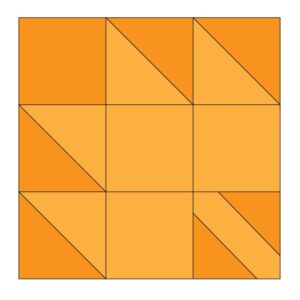
Step 2: Assembling the Maple Leaf Center
With your half-square triangles and squares sewn, it’s time to lay out your block. The maple leaf itself is a nine-patch, made up of:
- Four solid maple leaf squares
- One solid pumpkin fabric square
- Four half-square triangles (to complete the leaf).
Sew the nine-patch together in rows, and then join the rows to complete your maple leaf block.
Step 3: Sewing the Pumpkin Body
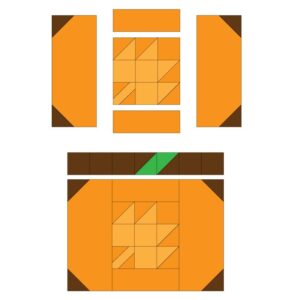
Now, let’s build the pumpkin around the maple leaf. The pumpkin block consists of background squares sewn onto the corners of your pumpkin fabric pieces. Simply sew the background squares diagonally across the corners to form the rounded shape of the pumpkin.
Once the side pieces are done, sew them to the maple leaf center.
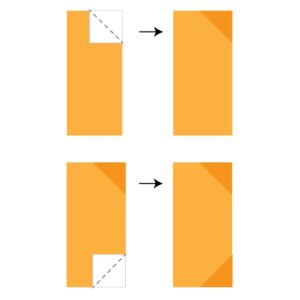
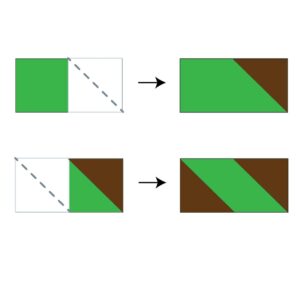
Step 4: Creating the Pumpkin Stem
For the pumpkin stem, cut one green rectangle and two background squares. Sew the squares on the diagonals, similar to creating a flying geese block, but with the diagonals parallel. This will give you a stem pointing either left or right, depending on the layout you prefer.
After you’ve assembled the stem, sew it to the top of the pumpkin block. Adjust the stem direction if needed to ensure everything lines up neatly with the maple leaf center.
Step 5: Putting Together the Pumpkin Block
With your pumpkin body and stem in place, it’s time to sew everything together. Align the green part of the stem with the center of the maple leaf and stitch the block pieces together. You now have a completed pumpkin block!
Step 6: Layout Options for Multiple Blocks
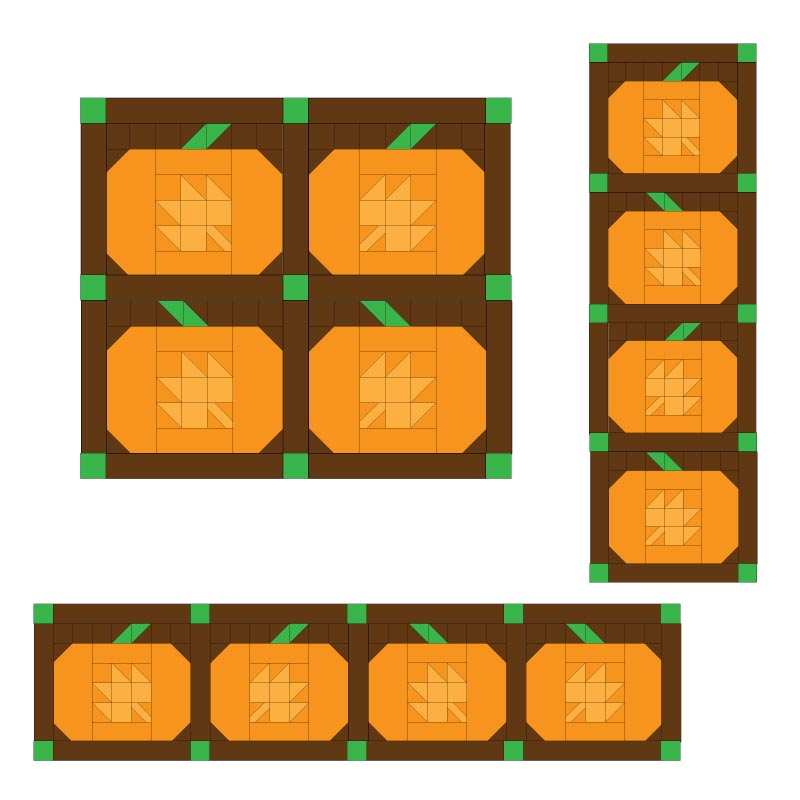
Once you’ve made several pumpkin blocks, there are a variety of ways to arrange them into larger quilted projects. Here are some fun layout ideas:
1. 2×2 Layout (Table Topper or Wall Hanging)
- Arrange four pumpkin blocks in a 2×2 grid.
- Add sashing and small green squares for the posts between blocks.
- This creates a charming wall hanging or small table topper, perfect for cozy fall décor.
2. Vertical Quilt (Banner)
- Stack your four pumpkin blocks vertically, adding sashing and post squares between them.
- This layout works well for narrow spaces, like a hallway or next to a door. It can also be used as a banner!
3. Horizontal Quilt (Bench Pillow or Mantle Decor)
- Lay out your blocks horizontally for a longer piece, which is great for a bench pillow or mantle display. You could even make a quilt for a longer table.
4. Placemats
- If you prefer smaller projects, create individual placemats with one pumpkin block each. Add sashing around the blocks for a polished look. These adorable placemats are a unique way to add a handmade touch to your fall table setting.
Final Touches and Variations
You can make all the blocks identical, or mix things up by varying the direction of the maple leaf and stem in each block. This adds an element of surprise and interest to your quilt.
For more flexibility, consider mixing in blocks with the stems pointing left or right. Play around with the directions of your blocks to create a dynamic quilt that is completely unique to your style!
I hope you enjoyed this Pumpkin Patch quilt block tutorial! This project is perfect for fall and can be adapted for any space in your home. Whether you choose to create a wall hanging, table runner, or placemats, the possibilities are endless. Be sure to grab the free pumpkin block pattern to make your own pumpkin blocks.
Happy quilting, and I’ll see you soon with another creative project! Until then, keep stitching!
3 Responses
I love pumpkins !This is really cute, maybe I have the pattern with the measurements.
Thank you!
Thanks Boni! The pattern for the block can be downloaded. The link is in the “Materials Needed” section of the article.